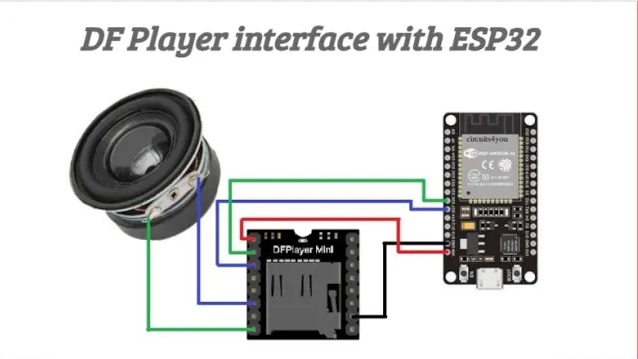
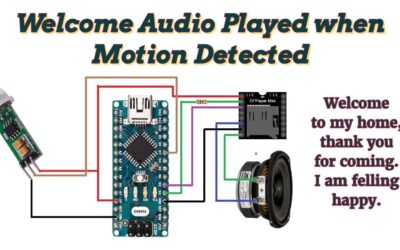
Learn how to interface the DFPlayer Mini module with the ESP32 microcontroller for audio playback in your projects. This step-by-step tutorial covers the wiring, code setup, and playback control, enabling you to add sound effects or music to your creations. Whether you’re working on IoT devices, robotics, or interactive displays, integrating audio has never been easier.
I am using:-
(Amazon links)
1. ESP32………………… https://amzn.to/47CZ4IO
2. DF Player mini……. https://amzn.to/3VaHbNU
3. 3watt Speaker……… https://amzn.to/44bdzAQ
4. Bread board………… https://amzn.to/45ilf5M
5. Jumper wires………. https://amzn.to/3YKEhiv
(Ali Express links)
1. ESP-32…… …………. https://s.click.aliexpress.com/e/_DF6ued1
2. Df player mini…….. https://s.click.aliexpress.com/e/_DmMUZZN
3. 3 watt Speaker……. https://s.click.aliexpress.com/e/_DD9DZQP
4. Jumper wires……… https://s.click.aliexpress.com/e/_DF0yEAR
5. Bread board……….. https://s.click.aliexpress.com/e/_DBzqbQL
Code:-
#include “SoftwareSerial.h”
#include “DFRobotDFPlayerMini.h”
// Use pins 2 and 3 to communicate with DFPlayer Mini
static const uint8_t PIN_MP3_TX = 26; // Connects to module’s RX
static const uint8_t PIN_MP3_RX = 27; // Connects to module’s TX
SoftwareSerial softwareSerial(PIN_MP3_RX, PIN_MP3_TX);
// Create the Player object
DFRobotDFPlayerMini player;
void setup() {
// Init USB serial port for debugging
Serial.begin(9600);
// Init serial port for DFPlayer Mini
softwareSerial.begin(9600);
// Start communication with DFPlayer Mini
if (player.begin(softwareSerial)) {
Serial.println(“OK”);
// Set volume to maximum (0 to 30).
player.volume(20);
// Play the first MP3 file on the SD card
player.play(1);
} else {
Serial.println(“Connecting to DFPlayer Mini failed!”);
}
}
void loop() {
}
Library for DF Player mini:- https://github.com/DFRobot/DFPlayer-Mini-mp3
More Projects

How to Play Different Audios Using a Keypad
How to Play Different Audios Using a Keypad and Arduino
Played Welcome Audio When Motion Detected
Played Welcome Audio When Motion Detected

Df Player interface with Arduino
How to play Audio by using Arduino and DF player mini.