
In this project, we will learn how to control audio playback using a 3×4 keypad and the DFPlayer Mini module. Each key on the keypad will trigger a different audio file, allowing you to create a variety of audio-based projects. This setup is perfect for applications like soundboards, audio guides, or interactive audio systems.
I am using:-
Purchase from Amazon.
1. Arduino UNO……………… https://amzn.to/48ND6nv
2. Df Player mini……………. https://amzn.to/4fzniXM
3. Keypad 4×3………………. https://amzn.to/4fKRNu2
4. SD Card……………………. https://amzn.to/3O48eWh
5. Jumper wires…………… https://amzn.to/3AL7KRO
6. Speaker……………………. https://amzn.to/3Z35y1E
Purchase from AliExpress.
1. Arduino UNO……………… https://s.click.aliexpress.com/e/_oEElgVt
2. Df Player mini……………. https://s.click.aliexpress.com/e/_DcQmkbb
3. Keypad 4×3………………. https://s.click.aliexpress.com/e/_DC0prKz
4. SD Card……………………. https://s.click.aliexpress.com/e/_DcuCSwD
5. Jumper wires…………… https://s.click.aliexpress.com/e/_De1oLy1
6. Speaker……………………. https://s.click.aliexpress.com/e/_Dde0tVb
Code:-
#include <Keypad.h>
#include <SoftwareSerial.h>
#include <DFRobotDFPlayerMini.h>
// Define keypad layout
const byte ROWS = 4; // Four rows
const byte COLS = 3; // Three columns
char keys[ROWS][COLS] = {
{‘1’, ‘2’, ‘3’},
{‘4’, ‘5’, ‘6’},
{‘7’, ‘8’, ‘9’},
{‘*’, ‘0’, ‘#’}
};
byte rowPins[ROWS] = {8, 7, 6, 5}; // Connect to the row pins of the keypad
byte colPins[COLS] = {4, 3, 2}; // Connect to the column pins of the keypad
Keypad keypad = Keypad(makeKeymap(keys), rowPins, colPins, ROWS, COLS);
SoftwareSerial mySerial(10, 11); // RX, TX for DFPlayer Mini
DFRobotDFPlayerMini myDFPlayer;
void setup() {
Serial.begin(9600);
mySerial.begin(9600); // Set serial baud rate for DFPlayer Mini
if (!myDFPlayer.begin(mySerial)) { // Check if DFPlayer Mini is connected
Serial.println(“Unable to begin DFPlayer Mini.”);
while (true);
}
myDFPlayer.setTimeOut(500);
myDFPlayer.volume(30); // Set volume to 20 (0-30 range)
}
void loop() {
char key = keypad.getKey(); // Read the key
if (key) {
Serial.print(“Key Pressed: “);
Serial.println(key);
if (key == ‘1’) {
myDFPlayer.playFolder(1, 1);
}
else if (key == ‘2’) {
myDFPlayer.playFolder(1, 2);
}
else if (key == ‘3’) {
myDFPlayer.playFolder(1, 3);
}
else if (key == ‘4’) {
myDFPlayer.playFolder(1, 4);
}
else if (key == ‘5’) {
myDFPlayer.playFolder(1, 5);
}
else if (key == ‘6’) {
myDFPlayer.playFolder(1, 6);
}
else if (key == ‘7’) {
myDFPlayer.playFolder(1, 7);
}
else if (key == ‘8’) {
myDFPlayer.playFolder(1, 8);
}
else if (key == ‘9’) {
myDFPlayer.playFolder(1, 9);
}
}
}
Library for DF Player mini:- https://github.com/DFRobot/DFPlayer-Mini-mp3
More Projects
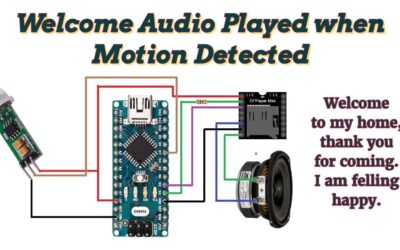
Played Welcome Audio When Motion Detected
Played Welcome Audio When Motion Detected
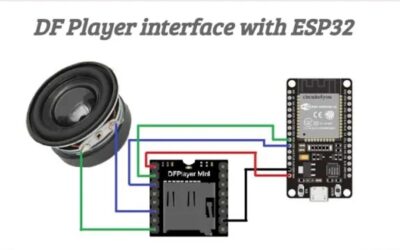
DFPlayer Mini Interface with ESP32
Audio Playback Tutorial | Add voice to ESP32

Df Player interface with Arduino
How to play Audio by using Arduino and DF player mini.